[Swift]IBDesignable을 이용하여 UIBezierPath로 +와 - 버튼 만들기
17 July 2015
이전에 작성한 인터페이스 빌더에서 실시간 렌더링을 통한 커스텀 뷰 만들기 in swift를 통해서 IBDesignable를 살펴보았습니다. 이번에는 원 안에 + 선과 - 선이 그려진 UIButton를 만들어 보고자 합니다.
프로젝트를 생성하고 UIButton의 Subclass인 AddButton 클래스 파일을 만듭니다.
import UIKit

class AddButton: UIButton {
	override func drawRect(rect: CGRect) {
	}
}
그리고 Storyboard에서 UIButton을 추가한 후 Identity Inspector의 Custom Class에 AddButton을 입력합니다.
다시 AddButton 클래스로 돌아가서 클래스 선언부 위에 @IBDesignable를 추가하여 Storyboard에서 실시간 렌더링 될 수 있도록 합니다.
import UIKit

@IBDesignable
class AddButton: UIButton {
	override func drawRect(rect: CGRect) {
	}
}
이제 drawRect 함수에서 원을 그려봅시다.
override func drawRect(rect: CGRect) {
	var path = UIBezierPath(ovalInRect: rect)
    UIColor.blueColor().setFill()
    path.fill()
}
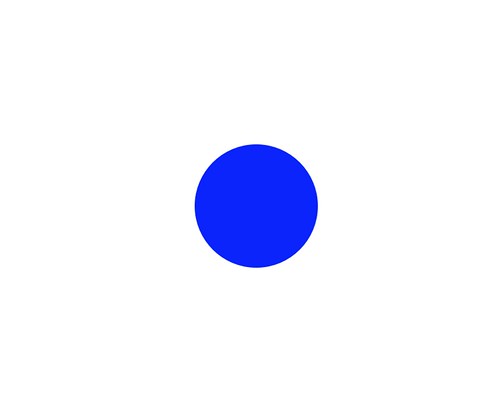
위의 코드를 작성하고 Storyboard로 이동하면 렌더링되어 파란색 원이 그려져있는 것을 볼 수 있습니다.
다음으로 + 선을 그리도록 합니다.
override func drawRect(rect: CGRect) {

    var path = UIBezierPath(ovalInRect: rect)
    UIColor.blueColor().setFill()
    path.fill()


    let lineWidth: CGFloat = min(bounds.width, bounds.height) * 0.7
    let linePath = UIBezierPath()

    linePath.lineWidth = 3.0

    // - 선을 그립니다.
    linePath.moveToPoint(CGPoint(
        x: bounds.width / 2 - lineWidth / 2,
        y: bounds.height / 2))

    linePath.addLineToPoint(CGPoint(
        x: bounds.width / 2 + lineWidth / 2,
        y: bounds.height / 2))

    // | 선을 그립니다.
    linePath.moveToPoint(CGPoint(
        x: bounds.width / 2,
        y: bounds.height / 2 - lineWidth / 2))

    linePath.addLineToPoint(CGPoint(
        x: bounds.width / 2,
        y: bounds.height / 2 + lineWidth / 2))

    UIColor.whiteColor().setStroke()
    linePath.stroke()
}
이제 Storyboard에서도 버튼 색 지정과 세로 선을 드러낼 지 여부를 선택할 수 있도록 @IBInspectable를 추가합니다.
@IBInspectable var fillColor: UIColor = UIColor.redColor()
@IBInspectable var isAddButton: Bool = true

override func drawRect(rect: CGRect) {

    var path = UIBezierPath(ovalInRect: rect)
    fillColor.setFill()
    path.fill()

    let lineWidth: CGFloat = min(bounds.width, bounds.height) * 0.7
    let linePath = UIBezierPath()

    linePath.lineWidth = 3.0

    // - 선을 그립니다.
    linePath.moveToPoint(CGPoint(
        x: bounds.width / 2 - lineWidth / 2,
        y: bounds.height / 2))

    linePath.addLineToPoint(CGPoint(
        x: bounds.width / 2 + lineWidth / 2,
        y: bounds.height / 2))

    if isAddButton {
		// | 선을 그립니다.
        linePath.moveToPoint(CGPoint(
            x: bounds.width / 2,
            y: bounds.height / 2 - lineWidth / 2))

        linePath.addLineToPoint(CGPoint(
            x: bounds.width / 2,
            y: bounds.height / 2 + lineWidth / 2))
    }

    UIColor.whiteColor().setStroke()
    linePath.stroke()
}
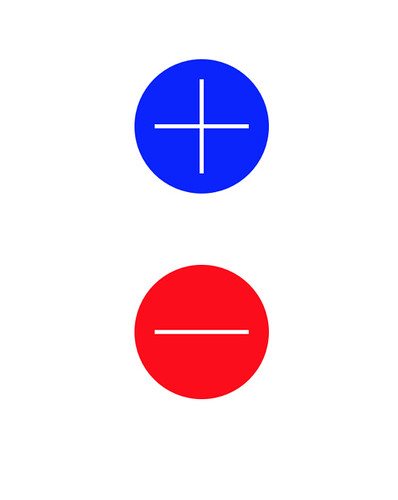
이제 AddButton을 더 만들더라도 Storyboard의 Attributes inspector에서 Fill Color와 isAddButton 값을 변경하여 + 버튼 또는 - 버튼으로 보이도록 할 수 있습니다.
다음에는 Material 디자인을 적용한 UIButton을 하나씩 만들어보도록 하겠습니다.
- swift 144
- uibutton 1
- drawRect 1
- UIBezierPath 2
- ovalInRect 1
- stroke 1
- IBDesignable 1
- IBInspectable 1
- Storyboard 5
- UIKit 5