[Swift]Control Flow 정리
제어 흐름(Control Flow)
Swift는 C 언어와 비슷한 제어문을 제공. 한 작업을 많은 시간을 수행하는 for와 while 반복문, 특정 조건에 따라 분기시켜 실행하는 if와 switch문, 실행 흐름을 코드의 다른 부분으로 이동시키는 break와 continue 문
for-in 반복문을 제공하여 쉽게 배열, 딕셔너리, 범위, 문자열 등 순서를 가진 것들을 쉽게 반복하여 사용할 수 있음.
swift의 switch 문은 C 언어보다 더 강력함. 왜냐하면 Swift에서 switch문은 “fall through”를 하지 않는데 일반적으로 C언어에서 실수로 break를 쓰지 않아 발생하는 에러를 방지함. 또한, 만은 다양한 패턴을 일치시킬 수 있는데 범위 일치, 튜플, 특정 타입에 cast를 할 수 있음.
case문 내에 임시 상수나 변수를 할당하여 사용할 수 있고, 복잡한 조건은 where 절을 각 case에 사용하여 표현할 수 있음.
For 반복문(For Loops)
Swift는 특정 횟수 만큼의 반복하여 수행하는 두 가지의 반복문이 있음.
-
for-in반복문은 range, sequence, collection 또는 progression에 각 아이템 만큼 수행함. -
for반복문은 특정 조건에 만족할 때까지 수행하며, 반복문이 끝날 때마다 counter가 증가함.
For-In
범위 수, 배열의 항목들, 문자열의 문자와 같이 여러 항목들의 집합을 반복할 때 for-in 반복문을 사용함.
for index in 1...5 {
    println("\(index) times 5 is \(index * 5)")
}

// 1 times 5 is 5
// 2 times 5 is 10
// 3 times 5 is 15
// 4 times 5 is 20
// 5 times 5 is 25
범위 내에 있는 값이 필요 없다면 밑줄(_, underscore)를 사용하여 값을 무시할 수 있음.
let base = 3
let power = 10
var answer = 1
for _ in 1...power {
    answer *= base
}
println("\(base) to the power of \(power) is \(answer)")
// prints "3 to the power of 10 is 59049"
배열에 for-in 반복문을 사용함.
let names = ["Anna", "Alex", "Brian", "Jack"]
for name in names {
    println("Hello, \(name)!")
}
// Hello, Anna!
// Hello, Alex!
// Hello, Brian!
// Hello, Jack!
딕셔너리에 Key-Value 쌍을 반복하여 접근할 수 있음. 딕셔너리의 각 항목은 (key, value) 튜플로 반환됨. 딕셔너리가 반복되면 (key, value) 튜플을 각 멤버로 나누어 for-in 반복문 안에서 사용함.
let numberOfLegs = ["spider": 8, "ant": 6, "cat": 4]
for (animalName, legCount) in numberOfLegs {
    println("\(animalName)s have \(legCount) legs")
}
// spiders have 8 legs
// cats have 4 legs
// ants have 6 legs
문자열내에 문자 값을 for-in 반복문을 사용할 수 있음.
for character in "Hello" {
    println(character)
}
// H
// e
// l
// l
// o
For
Swift는 전통적인 C언어 형태의 반복문을 지원.
for var index = 0; index < 3; ++index {
    println("index is \(index)")
}
// index is 0
// index is 1
// index is 2
다음은 for 반복문의 일반적인 형태.
for initialization; condition; increment {
    statements
}
상수와 변수는 초기화 표현 안에 선언하면 for 반복문 범위 안에서만 유효함. 만약 index를 반복문이 끝난 후에 계속 사용하려면 반복문 전에 미리 선언해야 함.
var index: Int
for index = 0; index < 3; ++index {
    println("index is \(index)")
}
// index is 0
// index is 1
// index is 2
println("The loop statements were executed \(index) times")
// prints "The loop statements were executed 3 times"
While 반복문(While Loops)
While 반복문은 조건이 false가 될 때 까지 수행함. 이러한 종류의 반복문은 반복 횟수를 알 필요가 없을 떄 가장 좋음.
Swift는 두 가지 방식의 while문을 제공함.
-
while은 반복문 시작시 조건을 검사. -
do-while은 반복문이 끝난 후에 조건을 검사.
While
While문은 한개의 조건을 검사하고 시작함. 조건이 true라면 false가 될 때까지 반복하여 수행.
While 문의 일반적인 형태
while condition {
    statements
}
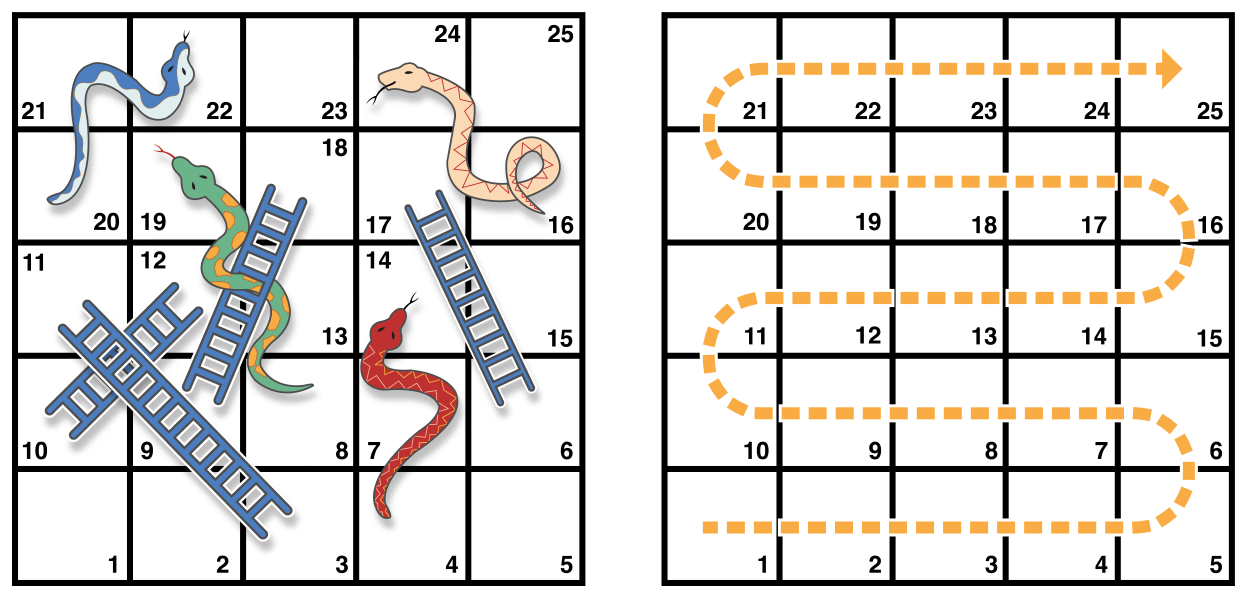
이번에 사용할 예제는 뱀과 사다리(폭포와 사다리로 알려진) 게임임.

다음은 게임의 규칙
- 게임 판에는 25개의 칸이 있으며, 25번 칸에 도착하거나 넘는 것이 목표.
- 각자의 차례에 6면 주사위를 굴려 칸을 점선에 따라 이동.
- 사다리 아랫부분에 도착하면 사다리 타고 올라감.
- 뱀 머리에 도착하면 뱀을 타고 내려감.
게임판은 Int 값의 배열로 나타내고 크기는 finalSquare 상수로 함. 게임에서 이겼는지 여부도 확인. 게임판은 26개 Int값 0으로 초기화 함.
let finalSquare = 25
var board = [Int](count: finalSquare + 1, repeatedValue: 0)
몇몇 칸은 특정 값으로 설정되며 이는 뱀과 사다리를 나타냄. 사다리 칸은 양수로 게임판에서 앞으로 전진하며, 뱀 머리 칸은 음수로 게임파넹서 뒤로 이동함.
board[03] = +08; board[06] = +11; board[09] = +09; board[10] = +02
board[14] = -10; board[19] = -11; board[22] = -02; board[24] = -08
3번쨰 칸은 사다리 밑부분을 포함하며 11 칸으로 이동하여, board[03]은 +08이 되도록 표시함.(3과 11의 차이)
참가자는 0번쨰 칸에서 시작하며 주사위를 처음 굴리면 항상 게임판으로 이동함.
var square = 0
var diceRoll = 0
while square < finalSquare {
    // roll the dice
    if ++diceRoll == 7 { diceRoll = 1 }
    // move by the rolled amount
    square += diceRoll
    if square < board.count {
        // if we're still on the board, move up or down for a snake or a ladder
        square += board[square]
    }
}
println("Game over!")
위에서 주사위를 굴리는 부분을 간단하게 처리함. 난수를 발생시키는 대신 diceRool의 값을 0으로 시작하며 while 반복문이 돌때마다 diceRoll은 증감 연산자를 통해 증가하고 너무 큰지 확인함. diceRoll 값이 7과 같으면 주사위가 너무 크다고 판단, 값을 1로 설정. diceRoll은 항상 1,2,3,4,5,6,1,2 순으로 주어짐.
주사위를 굴린 후 참가자는 diceRoll 만큼 앞으로 이동함. 참가자가 25칸을 넘으면 게임 끝. 이때 게임판의 count값보다 작은지 확인해야 하며 그렇지 않고 접근할 경우 에러 발생.
Do-While
While 반복문과는 다른 do-while 반복문은 먼저 코드를 실행한 후 조건을 검사함. 만약 조건이 false라면 더이상 돌지 않음.
do {
    statements
} while condition
뱀과 사다리 예제를 다시 보면 while 반복문 do-while 반복문이 더 적절하게 사용함. 이는 배열의 범위를 확인할 필요가 없기 때문.
do-while버전에서는 가장 먼저 사다리나 뱀 머리에 들어가 있는지 확인함. 사다리를 타고 가면 바로 25번 칸으로 이동하는 것이 불가능하기 때문.
do {
    // move up or down for a snake or ladder
    square += board[square]
    // roll the dice
    if ++diceRoll == 7 { diceRoll = 1 }
    // move by the rolled amount
    square += diceRoll
} while square < finalSquare
println("Game over!")
조건문(Conditional Statements)
조건에 따라 다른 코드를 실행할 유용함. 에러가 발생했을 때 특정 코드를 실행하거나 값이 너무 높거나 낮다면 메시지를 출력할 수도 있음.
Swift는 두가지 조건문을 제공하며, if문과 switch문임. 보통 if 문은 간단한 조건을 검증할 때 사용하며 Switch문은 다양하고 복잡한 조건일 때 사용함.
If
단순한 형태의 if문은 한 개의 if문을 가지며 조건이 true일 때만 실행됨.
var temperatureInFahrenheit = 30
if temperatureInFahrenheit <= 32 {
    println("It's very cold. Consider wearing a scarf.")
}
// prints "It's very cold. Consider wearing a scarf."
앞선 예제에선 온도가 화씨 온도가 32도와 같거나 작은지 여부를 확인. 다른 조건일 때는 아무런 메시지를 출력하지 못함.
if문은 else 키워드를 제공하여 if문이 false일 때 코드를 실행하도록 함.
temperatureInFahrenheit = 40
if temperatureInFahrenheit <= 32 {
    println("It's very cold. Consider wearing a scarf.")
} else {
    println("It's not that cold. Wear a t-shirt.")
}
// prints "It's not that cold. Wear a t-shirt."
위에서 두 개의 브랜치 중 하나는 반드시 실행됨.
여러 if문을 함께 쓰고자 할 때 else if문을 사용함.
temperatureInFahrenheit = 90
if temperatureInFahrenheit <= 32 {
    println("It's very cold. Consider wearing a scarf.")
} else if temperatureInFahrenheit >= 86 {
    println("It's really warm. Don't forget to wear sunscreen.")
} else {
    println("It's not that cold. Wear a t-shirt.")
}
// prints "It's really warm. Don't forget to wear sunscreen."
else 절은 옵션이므로 필요에 따라 작성할 수도 있고 안할 수도 있음.
Switch
Switch문은 값을 검토하여 그 겂과 맞는 여러 패턴들과 비교함. 그리고 값과 처음으로 맞는 패턴에 있는 코드를 실행. switch문은 if문보다 여러 경우에 대해 대응할 수 있음.
다음은 switch문의 간단한 형태.
switch some value to consider {
case value 1:
    respond to value 1
case value 2,
value 3:
    respond to value 2 or 3
default:
    otherwise, do something else
}
switch문은 여러 가능한 경우로 구성되어 있으며, 각각은 case키워드로 시작 험. Swift는 더 복잡한 패턴을 비교하는 여러 방법이 있음.
모든 Switch문은 타입의 모든 가능한 값이 switch 경우에 하나라도 만족해야 함을 의미. 만약 모든 경우에 만족하지 않는 값인 경우 default로 처리하며 가장 마지막에 위치해야 함.
다음은 Switch문의 문자 하나를 검토하는 예제.
let someCharacter: Character = "e"
switch someCharacter {
case "a", "e", "i", "o", "u":
    println("\(someCharacter) is a vowel")
case "b", "c", "d", "f", "g", "h", "j", "k", "l", "m",
"n", "p", "q", "r", "s", "t", "v", "w", "x", "y", "z":
    println("\(someCharacter) is a consonant")
default:
    println("\(someCharacter) is not a vowel or a consonant")
}
// prints "e is a vowel"
절대 다음으로 넘어가지 않음(No Implicit Fallthrough)
C와 Objective-C의 switch문과는 다르게, Swift의 switch문은 기본적으로 다음 경우로 넘어가지 않음. 대신 하나라도 패턴과 일치하면 Switch문은 끝남. break 문을 명시적으로 쓸 필요가 없음.
Switch 문의 각 경우는 실행 가능한 문이 최소 하나 이상 있어야 하며 만약 없다면 컴파일 에러 발생함. 이는 의도하지 않은 상태에서 다음 경우로 넘어가는 실수를 방지하기 위함.
let anotherCharacter: Character = "a"
switch anotherCharacter {
case "a":
case "A":
    println("The letter A")
default:
    println("Not the letter A")
}
// this will report a compile-time error
C에서의 switch문과는 다르게, Swift에서 Switch문은 “a”와 “A”는 일치하지 않음.
범위 일치(Range Matching)
switch 문은 범위 안에 값이 포함하는지 여부를 확인할 수 있음.
let count = 3_000_000_000_000
let countedThings = "stars in the Milky Way"
var naturalCount: String
switch count {
case 0:
    naturalCount = "no"
case 1...3:
    naturalCount = "a few"
case 4...9:
    naturalCount = "several"
case 10...99:
    naturalCount = "tens of"
case 100...999:
    naturalCount = "hundreds of"
case 1000...999_999:
    naturalCount = "thousands of"
default:
    naturalCount = "millions and millions of"
}
println("There are \(naturalCount) \(countedThings).")
// prints "There are millions and millions of stars in the Milky Way."
튜플(Tuples)
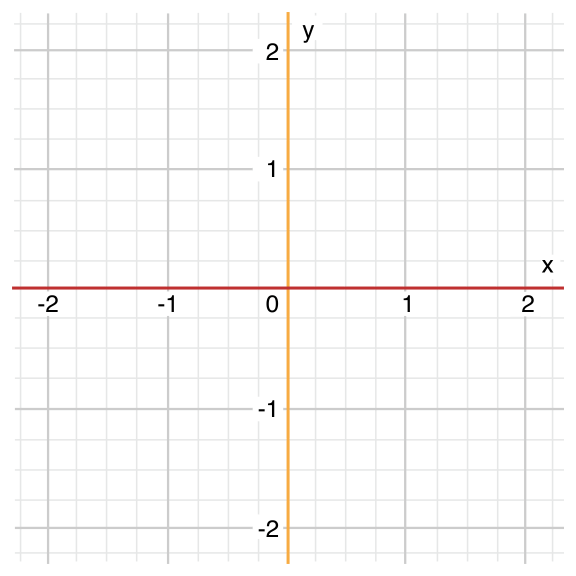
switch문에서 여러 개의 값을 검증하기 위해선 튜플을 사용할 수 있음. 튜플의 각 요소는 다른 값이나 값의 범위와 검증할 수 있음. 반면 임의의 가능한 값만 일치하고자 한다면 밑줄(_) 식별자를 사용함.
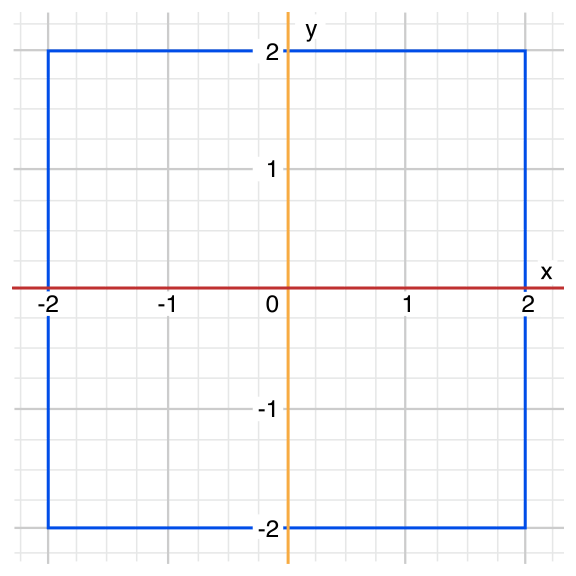
다음은 (x,y)로 표시된 점으로 간단한 (Int, Int)타입의 튜플을 표현한 것임. 이 점에서 그래프에 어느 구역에 있는지 분류함.
let somePoint = (1, 1)
switch somePoint {
case (0, 0):
    println("(0, 0) is at the origin")
case (_, 0):
    println("(\(somePoint.0), 0) is on the x-axis")
case (0, _):
    println("(0, \(somePoint.1)) is on the y-axis")
case (-2...2, -2...2):
    println("(\(somePoint.0), \(somePoint.1)) is inside the box")
default:
    println("(\(somePoint.0), \(somePoint.1)) is outside of the box")
}
// prints "(1, 1) is inside the box"

C와는 다르게 Swift는 switch문에 여러개의 경우를 같은 값이나 여러 값을 비교함.
값 묶기(Value Binding)
Switch문의 경우는 일치하는 값 또는 여러 값을 임시 상수나 변수로 묶을 수 있음. 이러한 임시 변수는 경우 안에서만 사용가능하며 이것을 값 묶기(value binding)이라고 함. 왜냐하면 경우 안에서 값이 임시 상수나 변수에 묶여 있기 때문.
아래는 값 묶기의 예제임.
let anotherPoint = (2, 0)
switch anotherPoint {
case (let x, 0):
    println("on the x-axis with an x value of \(x)")
case (0, let y):
    println("on the y-axis with a y value of \(y)")
case let (x, y):
    println("somewhere else at (\(x), \(y))")
}
// prints "on the x-axis with an x value of 2"

위에서 임시 상수로 x, y가 선언되며 anotherPoint의 튜플에 매칭되어 상수로 사용할 수 있음. 또한, 상수 (x,y) 튜플에 매칭되어 마찬가지로 사용함.
여기에선 default를 사용하지 않았는데 let (x,y)로 된 부분이 모든 경우를 다 포함하므로 사용할 필요가 없음.
Where
Switch의 경우에서 Where 절은 부가적인 조건을 확인하기 위해 사용함.
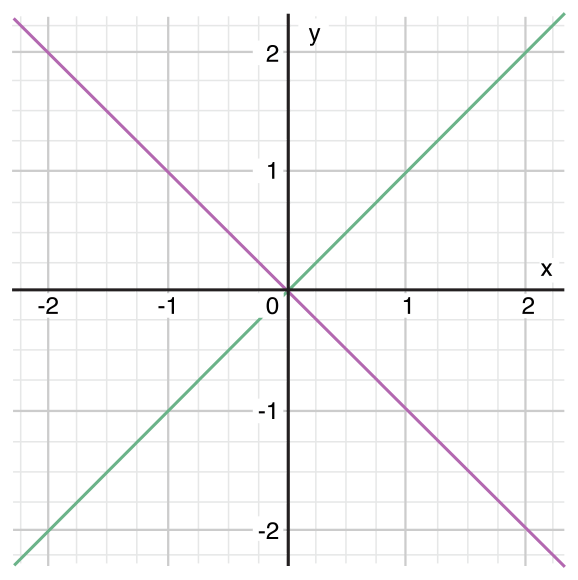
다음은 (x, y) 점이 그래프의 어느 구역에 위치하는지 분류하는 예제.
let yetAnotherPoint = (1, -1)
switch yetAnotherPoint {
case let (x, y) where x == y:
    println("(\(x), \(y)) is on the line x == y")
case let (x, y) where x == -y:
    println("(\(x), \(y)) is on the line x == -y")
case let (x, y):
    println("(\(x), \(y)) is just some arbitrary point")
}
// prints "(1, -1) is on the line x == -y"

Switch문은 좌표가 x==y일 때 녹색 사선에 있는지 x == -y일때 보라색 사선에 있는지, 그 외에 지점에 있는지 확인함.
switch의 세가지 경우는 yetAnotherPoint로부터 두 개의 튜플 값을 임시로 가져와 임의의 상수로 x와 y를 선언함. 이들 상수는 where 절의 한 부분으로 사용되며 동적인 필터를 만듬. 이 switch문은 point의 현재 값이 where절의 조건에 true로 일치해야함.
앞의 예제에서 default 경우는 마지막 경우가 모든 가능한 값과 일치하므로 사용할 필요가 없음.
제어 이동문(Control Transfer Statements)
제어 이동문은 특정 코드를 다른 곳으로 이동시키는 방법으로 코드 실행 순서를 변경함. Swift는 네 가지 제어 이동문이 있음.
- continue
- break
- fallthrough
- return
continue, break와 fallthrough는 아래에서 자세히 다루며 return문은 함수부분에서 다룸.
Continue
Continue문은 현재 작업을 멈추고 다음 반복문으로 넘어가서 시작하라고 명령함. 이는 루프에서 빠져나가지 않고 현재 반복 작업은 끝났음을 말함.
다음은 문자열에서 모음과 빈 칸을 제거하는 예제.
let puzzleInput = "great minds think alike"
var puzzleOutput = ""
for character in puzzleInput {
    switch character {
    case "a", "e", "i", "o", "u", " ":
        continue
    default:
        puzzleOutput.append(character)
    }
}
println(puzzleOutput)
// prints "grtmndsthnklk"
빈칸이나 모음과 일치하였을 때 continue 키워드를 호출하여 바로 다음 반복 명령으로 넘어가 시작함.
Break
break문은 흐름 제어문을 즉시 끝냄. break문은 switch문이나 반복문안에서 사용할 수 있음.
반복문 안에 Break(Break in a Loop Statement)
반복문안에 break를 사용할 때 즉시 종료시키며 반복문을 닫는 중괄호(}) 후의 첫번째 코드로 실행을 이동시킴.
Switch문 안에 Break(Break in a Switch Statement)
Switch문 안에 break는 즉시 종료시키며 switch문을 닫는 중괄호(}) 후의 첫번째 코드로 실행을 이동시킴.
Swift의 Switch문은 모든 경우를 일치시켜야함. 아무것도 하지 않는 경우에는 코드를 넣지 않으면 컴파일 에러가 발생하므로 break문을 사용하여 switch문의 실행을 종료시키도록 함.
let numberSymbol: Character = "三"  // Simplified Chinese for the number 3
var possibleIntegerValue: Int?
switch numberSymbol {
case "1", "١", "一", "๑":
    possibleIntegerValue = 1
case "2", "٢", "二", "๒":
    possibleIntegerValue = 2
case "3", "٣", "三", "๓":
    possibleIntegerValue = 3
case "4", "٤", "四", "๔":
    possibleIntegerValue = 4
default:
    break
}
if let integerValue = possibleIntegerValue {
    println("The integer value of \(numberSymbol) is \(integerValue).")
} else {
    println("An integer value could not be found for \(numberSymbol).")
}
// prints "The integer value of 三 is 3."
Fallthrough
Swift의 Switch문에서 기본적으로 각 경우 안에 있는 코드가 끝나면 다음 경우로 넘어기지 않음. 단지, Switch문이 바로 종료가 됨. C언어에서는 break를 쓰지 않으면 Switch문의 각 경우가 다음으로 넘어가는데 Swift도 각 경우 안의 코드가 종료된 후에 다음 항목으로 넘어갈려면 fallthrough 키워드를 사용함.
let integerToDescribe = 5
var description = "The number \(integerToDescribe) is"
switch integerToDescribe {
case 2, 3, 5, 7, 11, 13, 17, 19:
    description += " a prime number, and also"
    fallthrough
default:
    description += " an integer."
}
println(description)
// prints "The number 5 is a prime number, and also an integer."
fallthrough 키워드는 switch문의 경우 안에 있는 코드가 실행 한 후 바로 다음 경우로 넘어며 C 언어의 Switch 표준 행동과 같음.
표기한 구문
Swift에선 switch문과 다른 반복문을 중첩하여 사용하여 복잡한 제어 흐름구조를 만들 수 있음. 반복문과 switch문에 break문을 사용하여 빠르게 종료시킬 수 있음. 그래서 break문이 반복문이나 switch문 중 종료시키고자 하는 것을 명시적으로 나타내고자 함.
이러한 목적을 달성하기 위해 반복문이나 switch문에 구문 표기를 하여 표시할 수 있고, 표기한 구문 실행하여 종료하거나 계속하기 위해 표기된 break문이나 continue문을 사용함.
표기한 구문은 이름이 구문 소개자 키워드와 같은 줄에 위치하도록 나타내며 콜론(:)이 따름.
다음은 while문 문법에 표기한 예제.
label name: while condition {
    statements
}

testLoop: while 1 != 2 {
	statements
}
다음은 break와 continue문을 표기한 while 문에 적용한 뱀과 사다리 게임 예제임.
gameLoop: while square != finalSquare {
    if ++diceRoll == 7 { diceRoll = 1 }
    switch square + diceRoll {
    case finalSquare:
        // diceRoll will move us to the final square, so the game is over
        break gameLoop
    case let newSquare where newSquare > finalSquare:
        // diceRoll will move us beyond the final square, so roll again
        continue gameLoop
    default:
        // this is a valid move, so find out its effect
        square += diceRoll
        square += board[square]
    }
}
println("Game over!")
위의 예제에서 break문에 gameLoop 라벨을 사용하지 않으면, switch문에서 탈출하고 while문에서는 탈출하지 못함. gameLoop 라벨을 사용함에 따라 어느 제어문을 종료해야하는지 명확하게 만듬.
- swift 144
- control 1
- flow 1
- if 9
- switch 10
- for 3
- while 1
- break 1
- continue 1
- fallthrough 1
- label 1
- where 3
- case 7
- for-in 2
- tuple 4
- range 1
- string 4