[iOS][Swift 2.2]UIViewController에서 UITableView를 분리하여 가볍게 만들기
들어가기 전
일반적으로 iOS는 MVC 패턴을 사용하기 때문에 UIViewController가 UITableView를 가지며, UIViewController는 UITableView의 프로토콜인 UITableViewDelegate, UITableViewDataSource를 따릅니다.
UIViewController가 UITableView 프로토콜을 따르면 코드의 양이 많아져 가독성이 떨어지게 되고, 분석도 어려워집니다.

UITableView, 모델들 그리고 기타 View들이 한데 모인 UIViewController라면 더더욱 그렇습니다.
많은 방법도 있지만 AutoTable이라는 프로젝트에서 괜찮은 방법을 찾았습니다.
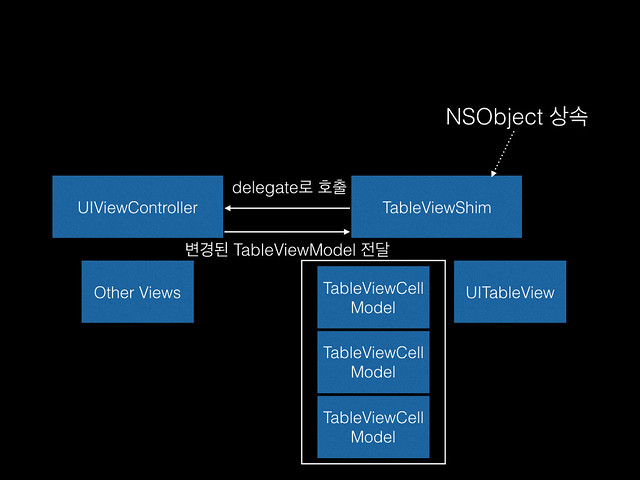
상세히 설명하기 전에 요약하자면, NSObject를 상속받은 클래스가 UITableView를 관리하도록 하고, 데이터와 셀을 묶어 TableViewModel이라는 것을 만들어 사용합니다. 그리고 셀을 다룰 때, TableViewModel에서 데이터와 셀에 적용할 함수를 가져와 적용합니다.
따라서 다양한 셀을 쉽게 다룰 수 있으며, 코드도 간결해집니다.

AutoTable
1.UITableView를 관리할 클래스인 TableViewShim을 만듭니다. 이 클래스는 NSObject를 상속받으며 UITableView 프로토콜을 따릅니다.
	final class TableViewShim: NSObject {
		weak var tableView: UITableView?

		init(tableView: UITableView) {
			self.tableView = tableView
			super.init()

			tableView.dataSource = self
			tableView.delegate = self
		}
	}

	extension TableViewShim: UITableViewDataSource, UITableViewDelegate {
		func numberOfSectionsInTableView(tableView: UITableView) -> Int {
			return 0
		}
		func tableView(tableView: UITableView, numberOfRowsInSection section: Int) -> Int {
			return 0
		}
		func tableView(tableView: UITableView, cellForRowAtIndexPath indexPath: NSIndexPath) -> UITableViewCell {
			return UITableViewCell()
		}
	}
2.TableView에서 사용할 셀, 데이터 그리고 데이터를 셀에 적용할 함수를 속성으로 가지는 Struct를 만듭니다.
	struct TableViewCellModel {
		let cellIdentifier: String
		let applyViewModelToCell: (UITableViewCell, Any) -> Void	// 데이터를 통해 셀을 다루는 함수 변수
		let customData: Any

		init(cellIdentifier: String,
			applyViewModelToCell: (UITableViewCell, Any) -> Void,
			customData: Any) {
				self.cellIdentifier = cellIdentifier
				self.applyViewModelToCell = applyViewModelToCell
				self.customData = customData
		}
	}

	extension TableViewCellModel {
		func applyViewModelToCell(cell: UITableViewCell) {
			self.applyViewModelToCell(cell, self.customData)
		}
	}
TableViewCellModel은 cellIdentifier와 Any 타입인 customData를 가지고, applyViewModelToCell는 customData를 UITableViewCell에 적용하는 함수를 가집니다.
3.TableViewCellModel을 여러 개 가지는 Section을 만듭니다. 그리고 여러 개 Section을 가진 TableViewModel을 만듭니다.
	struct TableViewSectionModel {
		let cells: [TableViewCellModel]

		let sectionHeaderTitle: String? = nil
		let sectionFooterTitle: String? = nil

		init(cells: [TableViewCellModel]) {
			self.cells = cells
		}
	}

	struct TableViewModel {
		let sections: [TableViewSectionModel]

		init(sections: [TableViewSectionModel]) {
			self.sections = sections
		}

		// indexPath를 이용하여 TableViewCellModel을 조회하는 subscript
		subscript(indexPath: NSIndexPath) -> TableViewCellModel {
			return self.sections[indexPath.section].cells[indexPath.row]
		}
	}
4.여러 개의 TableViewCellModel을 가진 TableViewSectionModel, 여러 개의 TableViewSectionModel를 가진 TableViewModel를 만듭니다.
	func viewModelForInteger(int: Int) -> TableViewCellModel {

		// 셀 타입에 따라 셀을 가공하는 중첩 함수
		func applyViewModelToCell(cell: UITableViewCell, data: Any) {
			guard let cell = cell as? ExampleCell else { return }
			guard let int = data as? Int else { return }

			cell.textLabel.text = String(int)
		}

		return TableViewCellModel(
			cellIdentifier: ExampleCell.cellIdentifier,
			applyViewModelToCell: applyViewModelToCell,
			customData: int
		)
	}

	func tableViewModelForIntList(ints: [Int]) -> TableViewModel {
		return TableViewModel(sections: [
			TableViewSectionModel(cells:
				ints.map { viewModelForInteger($0) }
			)
		])
	}
viewModelForInteger에서 applyViewModelToCell는 cell이 ExampleCell 타입인지 판별하고, data가 Int 타입인지 판별하고 cell에 적용합니다. 만약 셀 타입이 여러 개인 경우 각 셀 타입에 따라 분기 처리하면 됩니다.
5.1번에서 만들었던 TableViewShim를 TableViewModel을 적용해 다시 작성해봅시다.
	struct CellTypeDefinition {
		let nibFilename: String
		let cellIdentifier: String
	}

	final class TableViewShim: NSObject {
		var tableViewModel: TableViewModel!
		let cellTypes: [CellTypeDefinition]
		let tableView: UITableView

		init(cellTypes: [CellTypeDefinition], tableView: UITableView, tableViewModel: TableViewModel) {
			self.cellTypes = cellTypes
			self.tableView = tableView
			self.tableViewModel = tableViewModel

			cellTypes.forEach {
				let nibFile = UINib(nibName: $0.nibFilename, bundle: nil)
				tableView.registerNib(nibFile, forCellReuseIdentifier: $0.cellIdentifier)
			}
			super.init()

			self.tableView.dataSource = self
			self.tableView.delegate = self
		}
	}

	public func numberOfSectionsInTableView(tableView: UITableView) -> Int {
		return self.tableViewModel.sections.count
	}

	public func tableView(tableView: UITableView, numberOfRowsInSection section: Int) -> Int {
		return self.tableViewModel.sections[section].cells.count
	}

	public func tableView(tableView: UITableView, cellForRowAtIndexPath indexPath: NSIndexPath) -> UITableViewCell {
		let cellViewModel = self.tableViewModel[indexPath]
		let cell = tableView.dequeueReusableCellWithIdentifier(cellViewModel.cellIdentifier) ?? UITableViewCell()
		cellViewModel.applyViewModelToCell(cell)
		return cell
	}
TableViewShim는 초기화 할 때, CellTypeDefinition을 받아 tableView에 registerNib을 수행합니다. 그리고 tableViewModel은 tableView의 Data 역할을 합니다.
cell을 만들 때, cellViewModel.applyViewModelToCell(cell)을 통해 ViewModel을 Cell에 적용합니다.
위 코드는 여러 타입의 셀이라도 코드가 간결하게 될 수 있음을 말해줍니다.
이제 UIViewController가 TableViewShim 클래스를 생성하고 tableView를 넘겨주는 코드를 작성합니다.
	class ViewController: UIViewController {
		@IBOutlet var tableView: UITableView!
		var tableViewRenderer: TableViewShim!
		var ints = [1,2,3,4,5]
		let cellTypes = [
			CellTypeDefinition(
				nibFilename: ExampleCell.nibFilename,
				cellIdentifier: ExampleCell.cellIdentifier
			)]

		override func viewDidLoad() {
			super.viewDidLoad()

			let viewModel = viewModelForInteger(ints)
			self.tableViewRenderer = TableViewShim(cellTypes: cellTypes, tableView: tableView, tableViewModel: viewModel)
		}
	}
이제 UIViewController는 UITableView를 신경 쓰지 않아도 되었습니다. tableViewRenderer에 모두 넘겼으며, UIViewController는 데이터를 다루기만 하면 됩니다. 만약 데이터가 변경된다면 변경된 데이터를 tableViewRenderer에 알려 갱신하도록 요청하면 됩니다.
정리
위에서는 UITableView를 관리하는 클래스를 만들어서 다루었는데, 마찬가지로 UICollectionView도 위와 같은 방식을 사용할 수 있습니다.
UIViewController에서 많은 코드가 작성되는 UITableView를 쉽게 관리할 수 있었으며, UIViewController의 역할을 많이 줄일 수 있었습니다.
참고 자료
- UIViewController 5
- UITableView 1
- NSObject 3
- Swift 92
- UITableViewDelegate 1
- UITableViewDataSource 1
- TableViewModel 1