[Swift][SwiftPM] Swift Package로 리소스 번들링하기
Swift 5.3에서 Swift Package에 리소스를 추가할 수 있게 되었습니다. 릴리즈 노트
Swift 5.3 이전 버전에서는 Swift Package의 타입을 Dynamic으로 만들더라도 리소스가 복사되지 않았지만, 이제는 가능해졌습니다. 프레임워크를 만들더라도 기존에는 프로젝트를 만들어서 했다면, 이제는 Swift Package로도 가능하게 되었습니다.
그렇다면 Swift Package로 리소스 번들링 해봅시다.
Swift Package로 리소스 번들링하기
Feature Package 만들기
첫번째로, 다음과 같이 프로젝트 내에 Feature라는 Local Swift Package를 만듭니다.
Feature 폴더 내에 FeatureViewController 클래스 파일을 만듭니다.
/// Module: Feature
/// FileName: FeatureViewController.swift
import Foundation
import UIKit

public final class FeatureViewController: UIViewController {
    public override func viewDidLoad() {
        super.viewDidLoad()

        self.view.backgroundColor = .black
    }
}
그리고 Resources 라는 폴더를 만들고, Feature에 사용할 ViewController를 담당할 Storyboard와 이미지를 만듭니다.
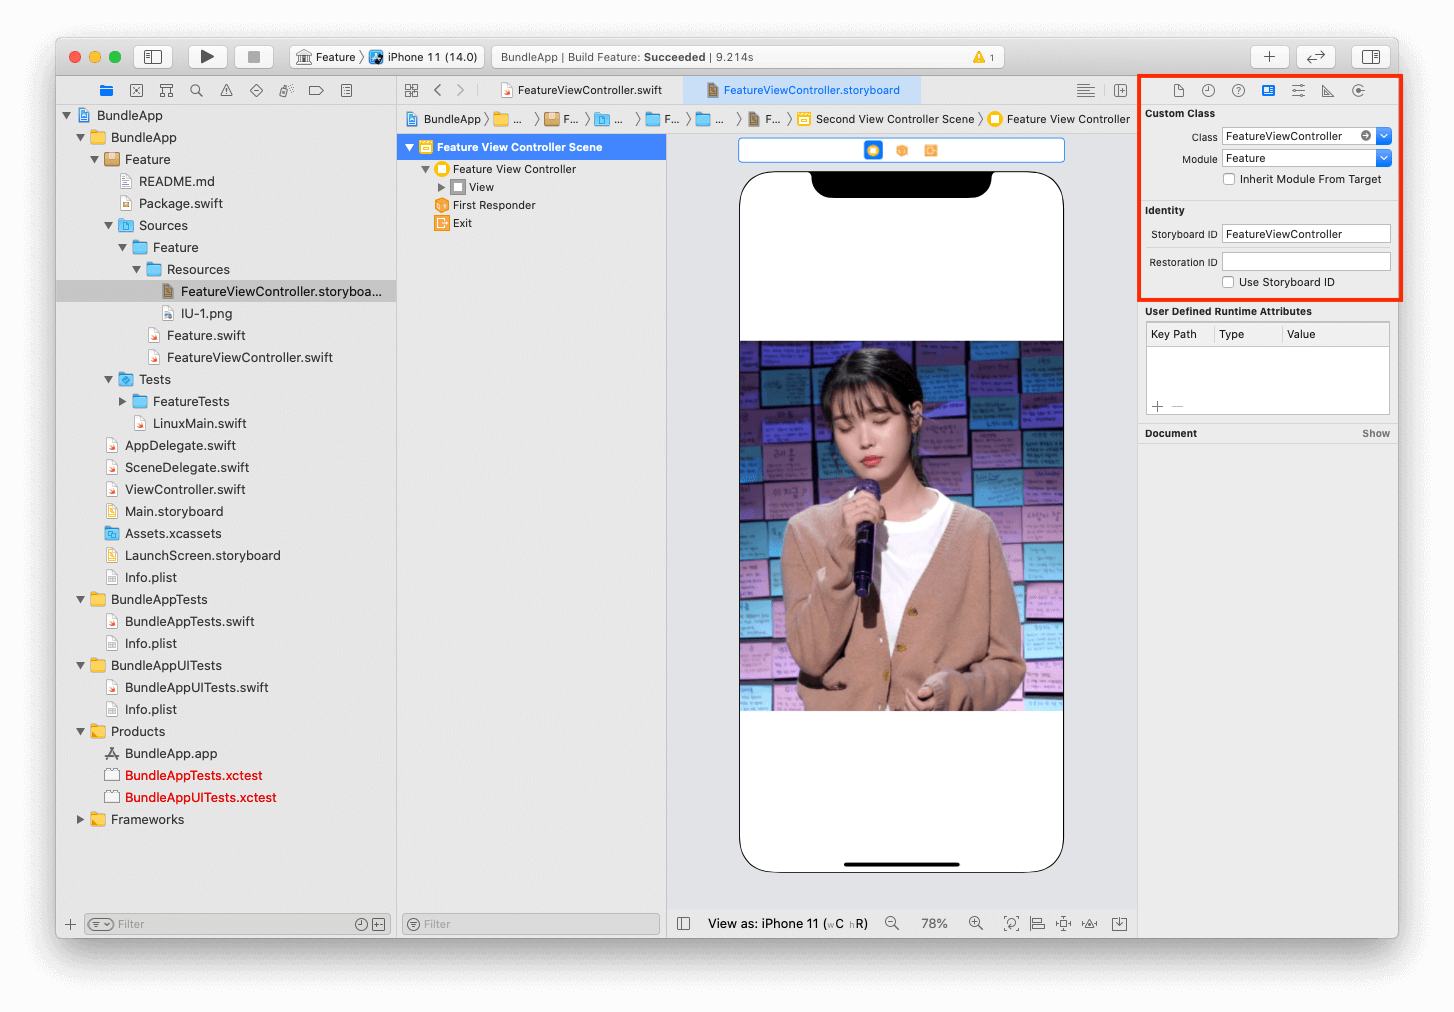
스토리보드의 ViewController의 Custom Class 항목의 Module은 Feature, Class는 FeatureViewController를 지정해줘야 합니다. 이 패키지의 모듈 이름이 Feature이기 때문입니다.
다음으로 Package.swift로 가서 Feature 타겟에 resources 항목을 추가합니다. 스토리보드와 이미지가 Resources 폴더에 있으므로, .process("Resources") 로 추가합니다.
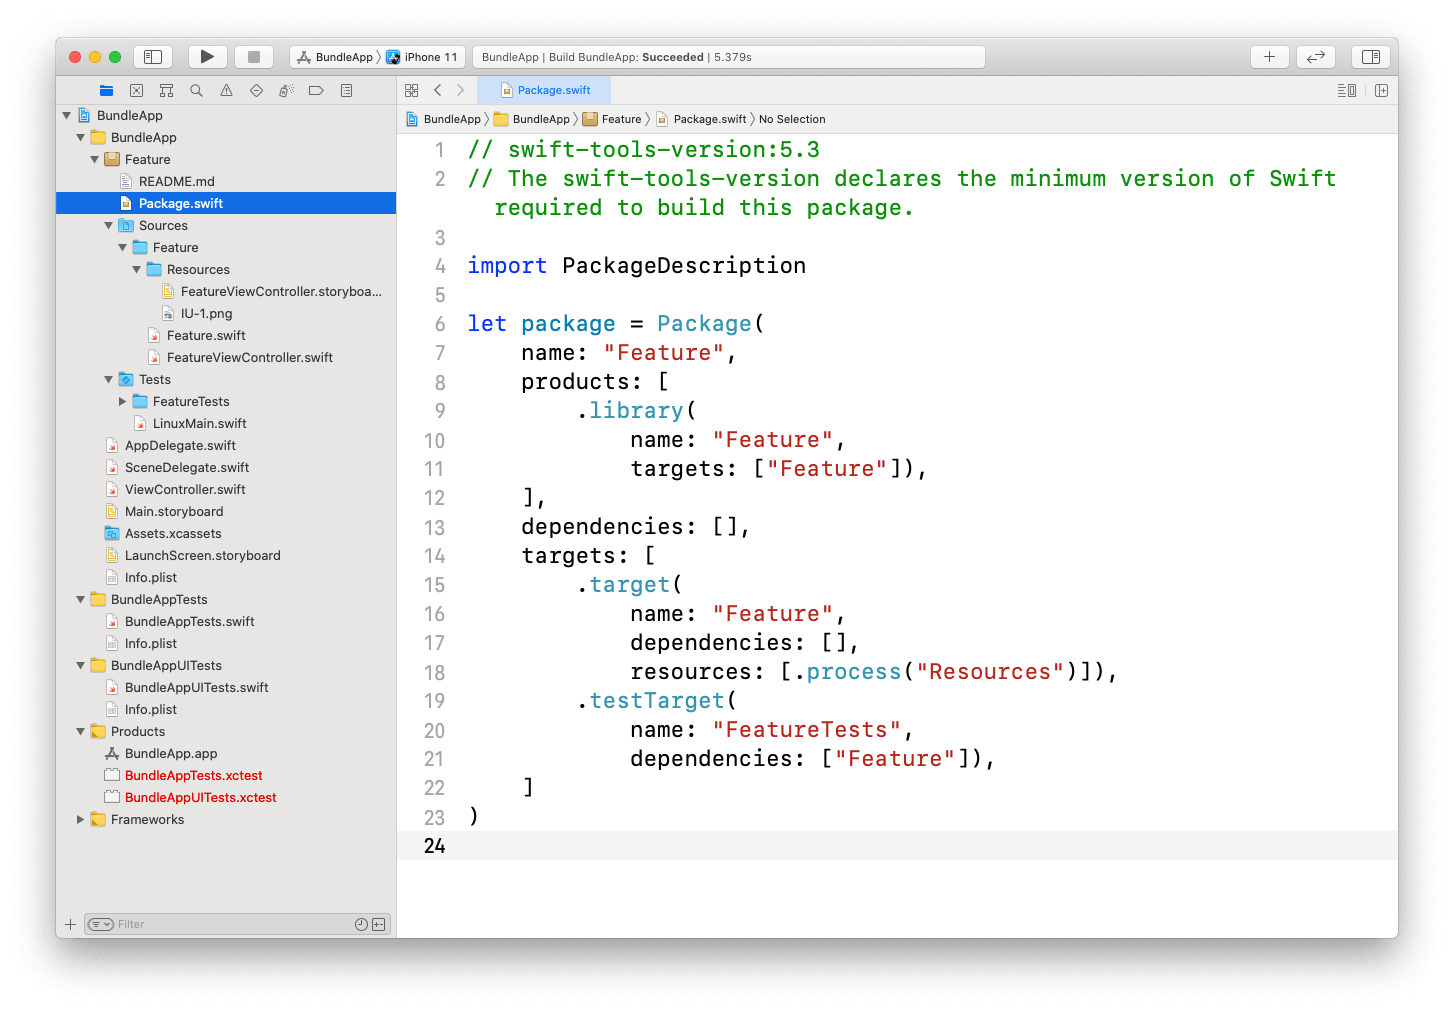
.target(
  name: "Feature",
  dependencies: [],
  resources: [.process("Resources")]
)
리소스는 두가지 방법 process, copy 을 지원합니다.
resources: [.process("Resources"), .copy("Resouces/Image")]
process는 해당 경로에 있는 모든 리소스를 번들로 만들때 한 뎁스로 만들어줍니다.
/// before
Resources
├── Image
│   └── IU-1.png
└── Storyboard
    └── FeatureViewController.storyboard

/// after
Feature_Feature.bundle
├── IU-1.png
└── FeatureViewController.storyboard
copy는 폴더 구조를 그대로 안고 갑니다.
/// before
Resources
├── Image
│   └── IU-1.png
└── Storyboard
    └── FeatureViewController.storyboard

/// after
Feature_Feature.bundle
├── Image
│   └── IU-1.png
└── Storyboard
    └── FeatureViewController.storyboard
특별한 이유가 아니면 copy 보다는 process 를 사용하는 것이 좋습니다.
App에서 FeatureViewController 띄우기
App에서 FeatureViewController를 띄우도록 해봅시다.
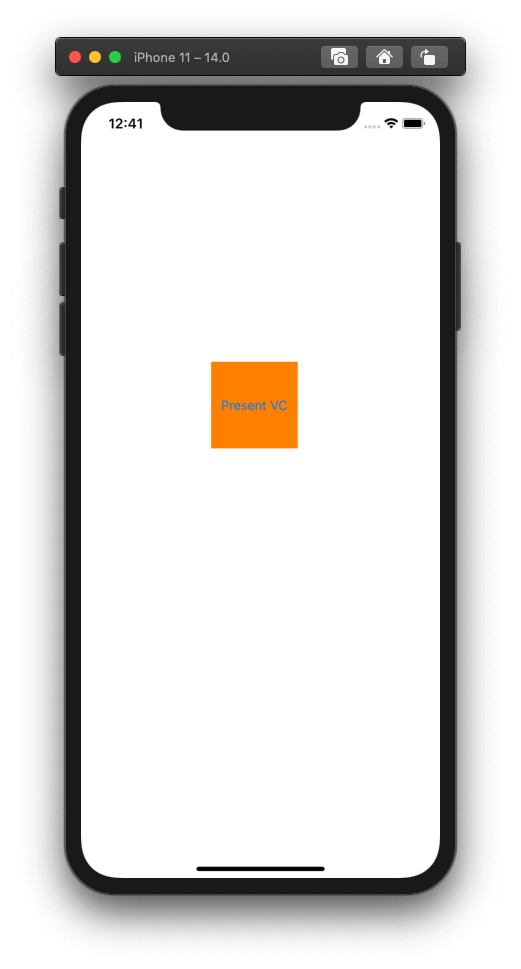
첫번째로 ViewController.swift 파일에서 Button을 만듭니다.
import UIKit

class ViewController: UIViewController {
  override func viewDidLoad() {
    super.viewDidLoad()

    let action = UIAction(title: "Present VC", handler: presentFeature)
    let button = UIButton(type: .system,
                          primaryAction: action)
    button.frame = .init(x: 150, y: 300, width: 100, height: 100)
    button.backgroundColor = .orange
    self.view.addSubview(button)
  }
  func presentFeature(_ action: UIAction) {}
}
다음으로, Feature 모듈의 번들을 알아야 합니다. Apple Document를 보면 Bundle.module으로 접근하여 번들을 얻을 수 있다고 합니다.
하지만 Bundle.module는 접근제어자가 internal이라 Swift Package 내에서만 접근이 가능하고, App에서는 알 수 없습니다. Swift Package 내에서 Bundle.module 을 접근하면 내부에서 resource_bundle_accessor.swift 라는 파일이 만들어지고, Bundle.module을 자동으로 구현해 놓고 있습니다.
/// resource_bundle_accessor.swift
import class Foundation.Bundle

private class BundleFinder {}

extension Foundation.Bundle {
    /// Returns the resource bundle associated with the current Swift module.
    static var module: Bundle = {
        let bundleName = "Feature_Feature"

        let candidates = [
            // Bundle should be present here when the package is linked into an App.
            Bundle.main.resourceURL,

            // Bundle should be present here when the package is linked into a framework.
            Bundle(for: BundleFinder.self).resourceURL,

            // For command-line tools.
            Bundle.main.bundleURL,
        ]

        for candidate in candidates {
            let bundlePath = candidate?.appendingPathComponent(bundleName + ".bundle")
            if let bundle = bundlePath.flatMap(Bundle.init(url:)) {
                return bundle
            }
        }
        fatalError("unable to find bundle named Feature_Feature")
    }()
}
App에서 Feature 패키지의 번들을 접근하도록 Feature 패키지에서 코드를 추가합니다.
/// Module: Feature
/// FileName: Bundle+Feature

import Foundation

public extension Bundle {
    static var feature: Bundle { .module }
}
이제 Feature 번들을 알았으니 ViewController.swift 로 돌아가서 FeatureViewController를 띄워봅시다.
import UIKit
import Feature

class ViewController: UIViewController {
  override func viewDidLoad() {
    super.viewDidLoad()

    let action = UIAction(title: "Present VC", handler: presentFeature)
    let button = UIButton(type: .system, primaryAction: action)
    button.frame = .init(x: 150, y: 300, width: 100, height: 100)
    button.backgroundColor = .orange
    self.view.addSubview(button)
  }

  func presentFeature(_ action: UIAction) {
	let storyboard = UIStoryboard(name: "FeatureViewController", bundle: Bundle.feature)
    let vc = storyboard.instantiateViewController(identifier: "FeatureViewController") as! FeatureViewController
    self.present(vc, animated: true, completion: nil)
  }
}
FeatureViewController를 정상적으로 띄우는 것을 확인할 수 있습니다.
컴파일 과정을 한번 살펴봅시다.
Feature_Feature.bundle을 빌드할 때, 스토리보드를 컴파일 & 링킹하고, 이미지를 복사하는 것을 확인할 수 있습니다.
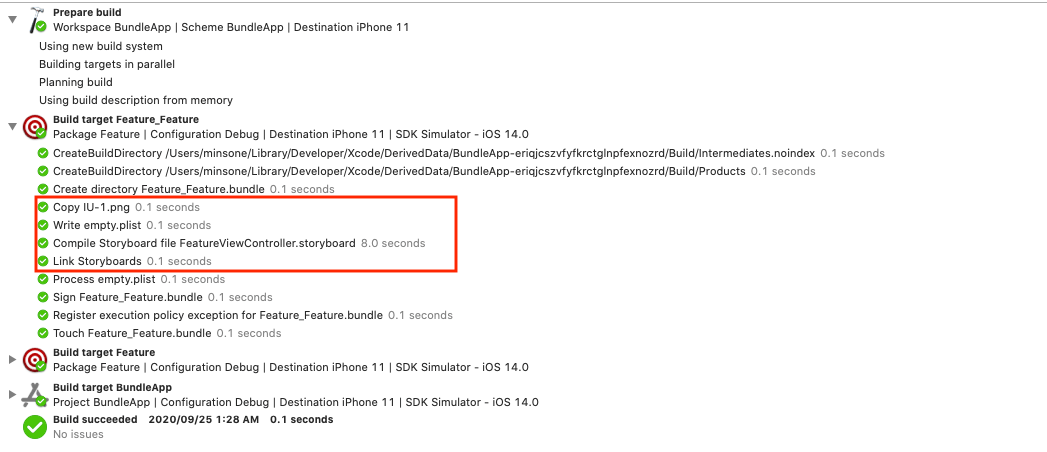
그리고 App을 빌드 할 때, Feature_Feature.bundle를 복사하는 것을 확인할 수 있습니다.
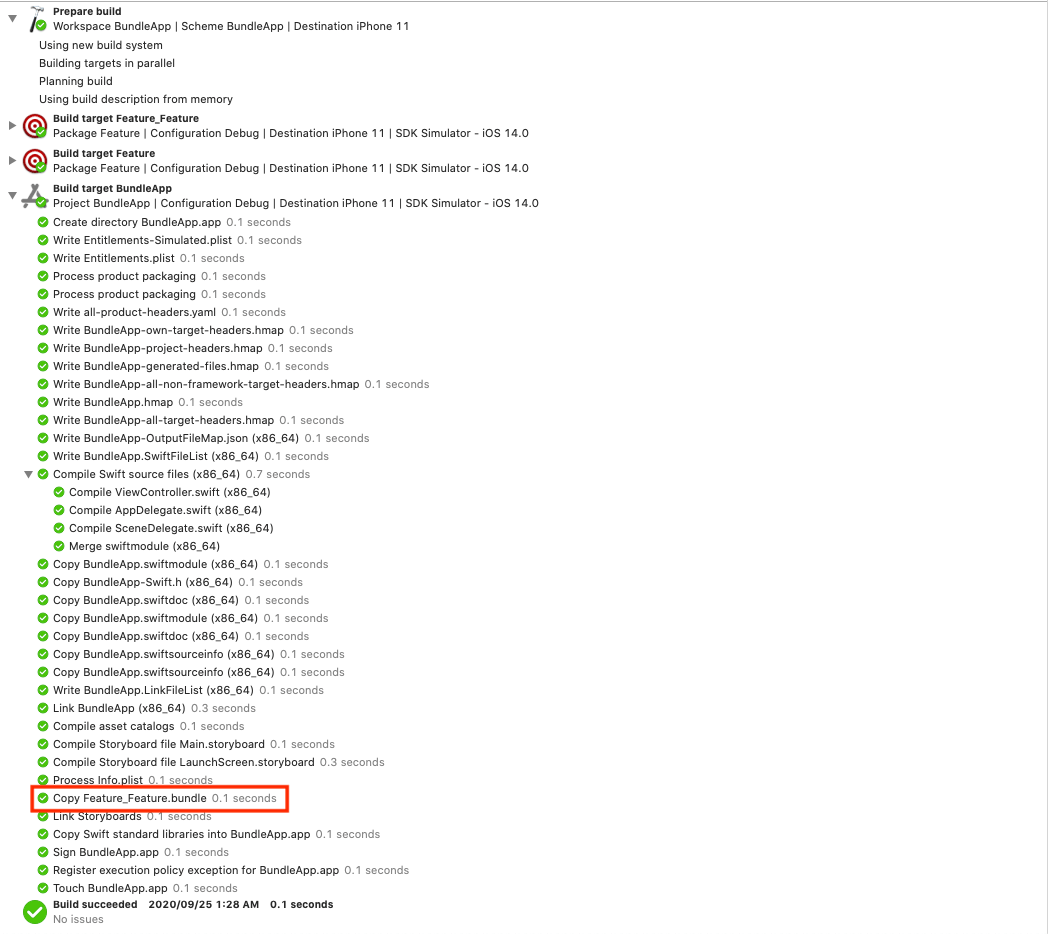
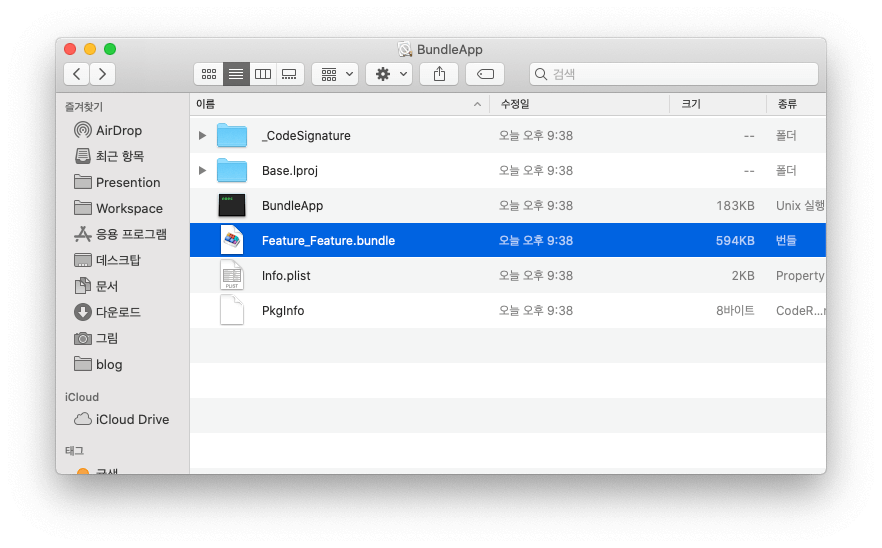
다음으로 App 결과물을 한번 살펴봅시다.
App을 살펴보면 Feature_Feature.bundle이 있는 것을 확인할 수 있습니다.
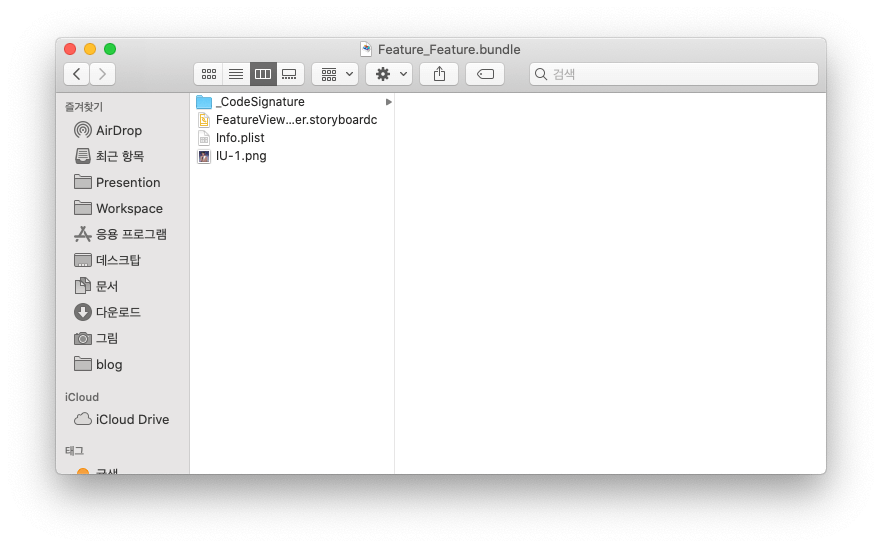
Feature_Feature.bundle 번들 내부를 보면 리소스인 스토리보드와 이미지가 있는 것을 확인할 수 있습니다.
위 코드는 여기에서 확인할 수 있습니다.
다중 Swift Package 리소스 번들링하기
이제 Feature와 같은 패키지를 여러개를 만들어, 그 패키지들을 의존성으로 가지는 패키지를 만들려고 합니다.
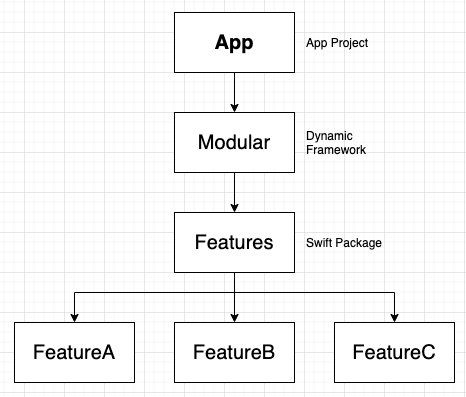
위 구조로 프로젝트를 만들었습니다.
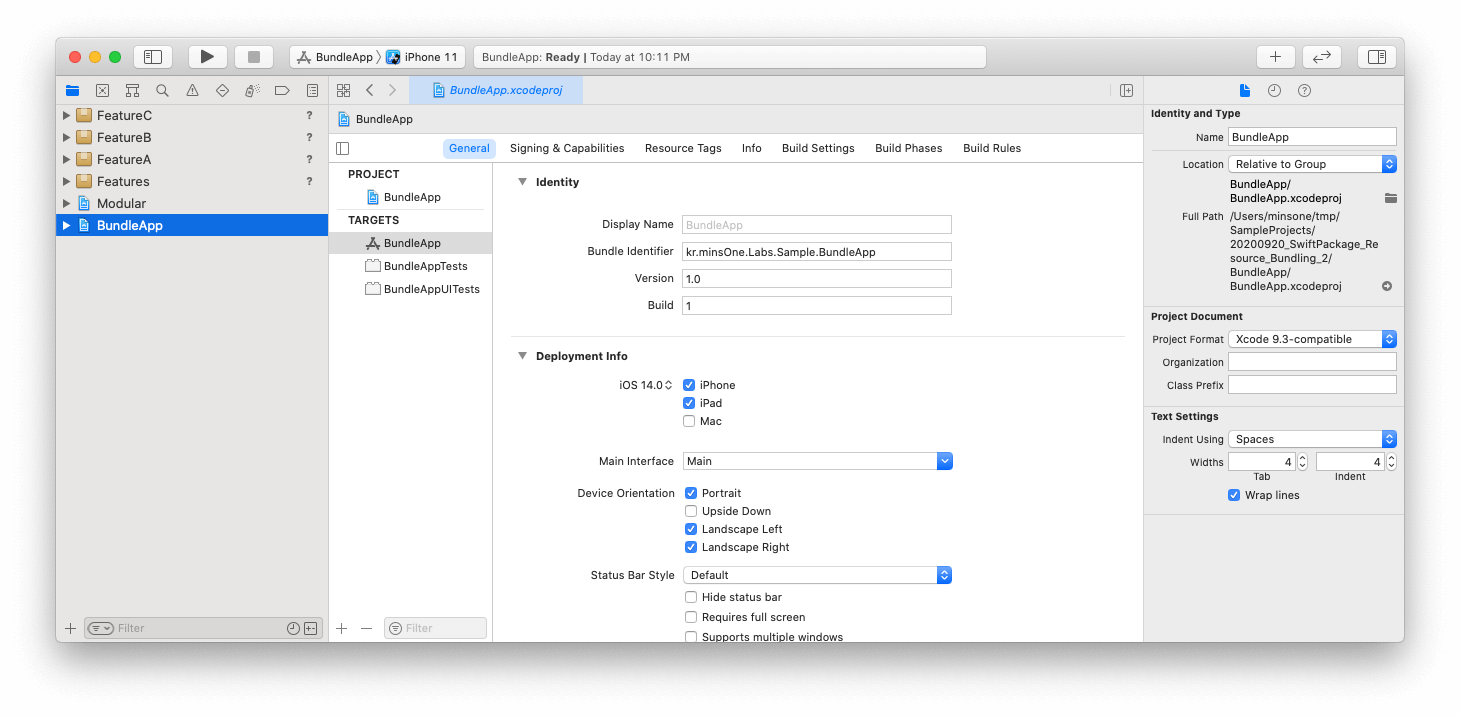
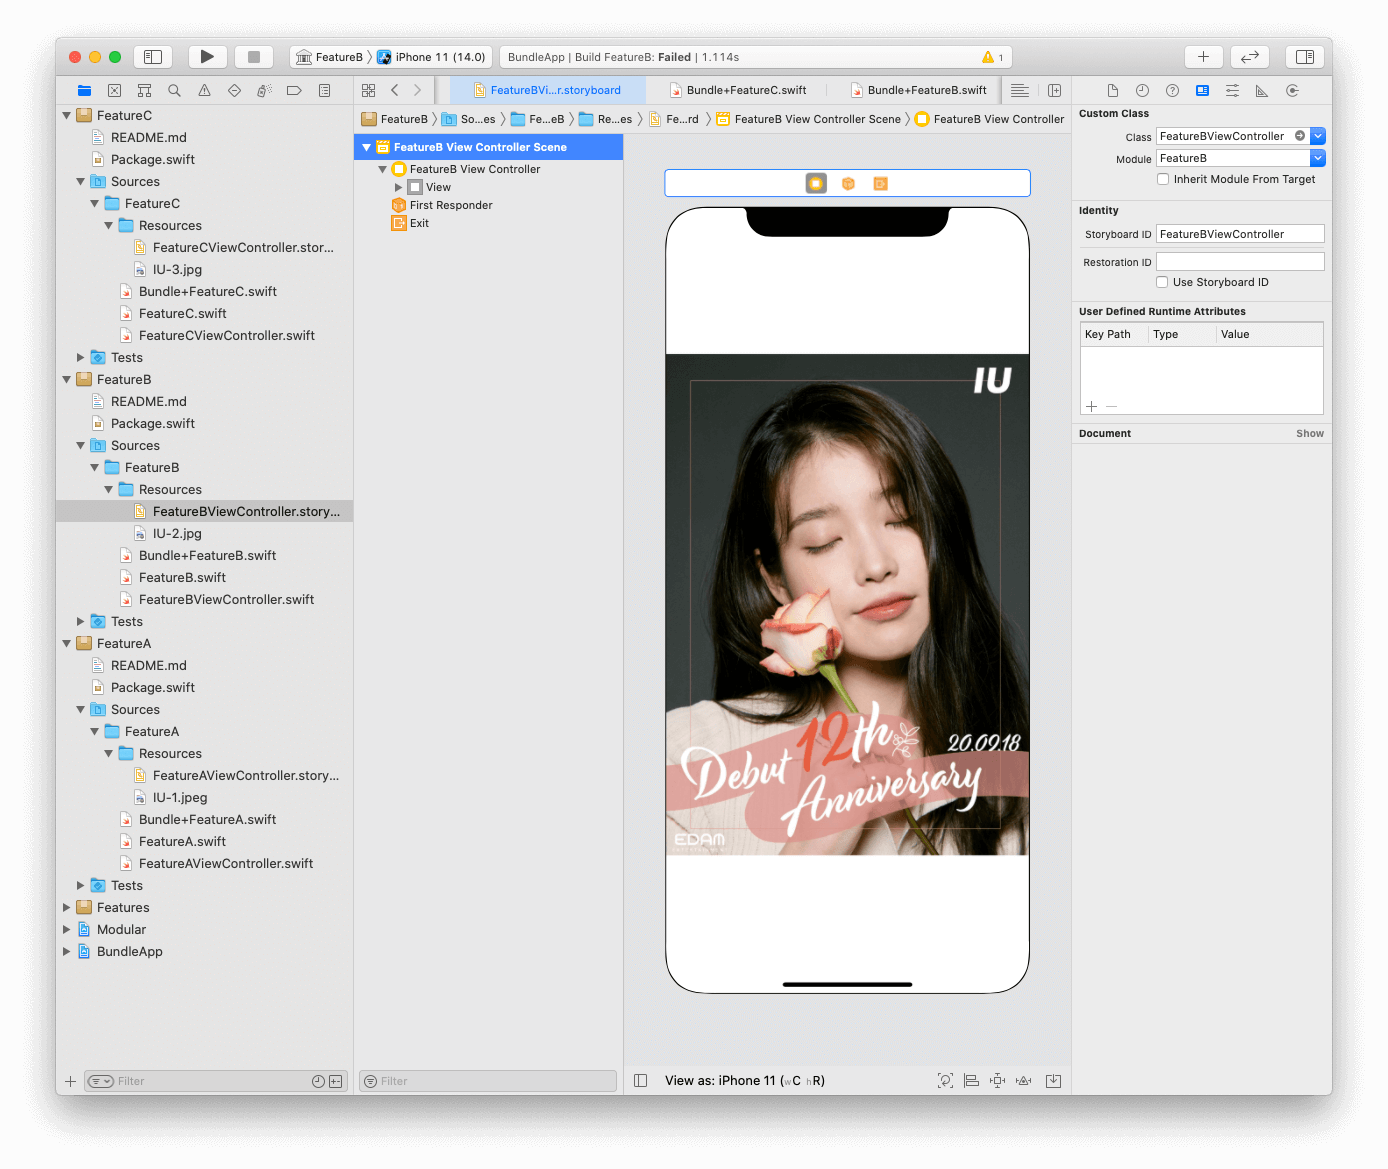
FeatureA, B, C는 앞에서 추가했던 리소스인 스토리보드와 이미지를 각각 만들어 추가합니다.
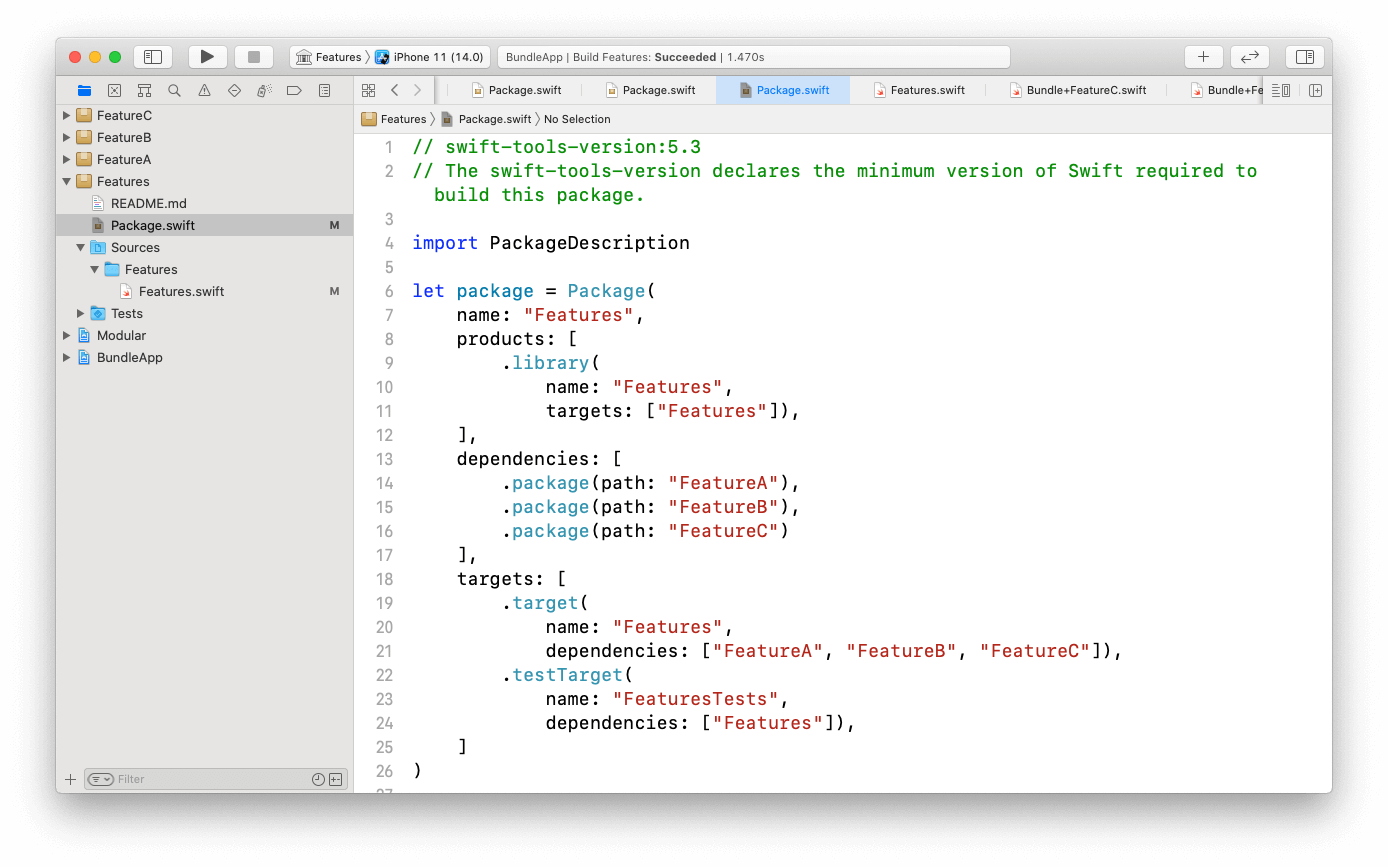
이제 Features 패키지에서 FeatureA, B, C를 의존성을 가지도록 Package.swift에 추가합니다.
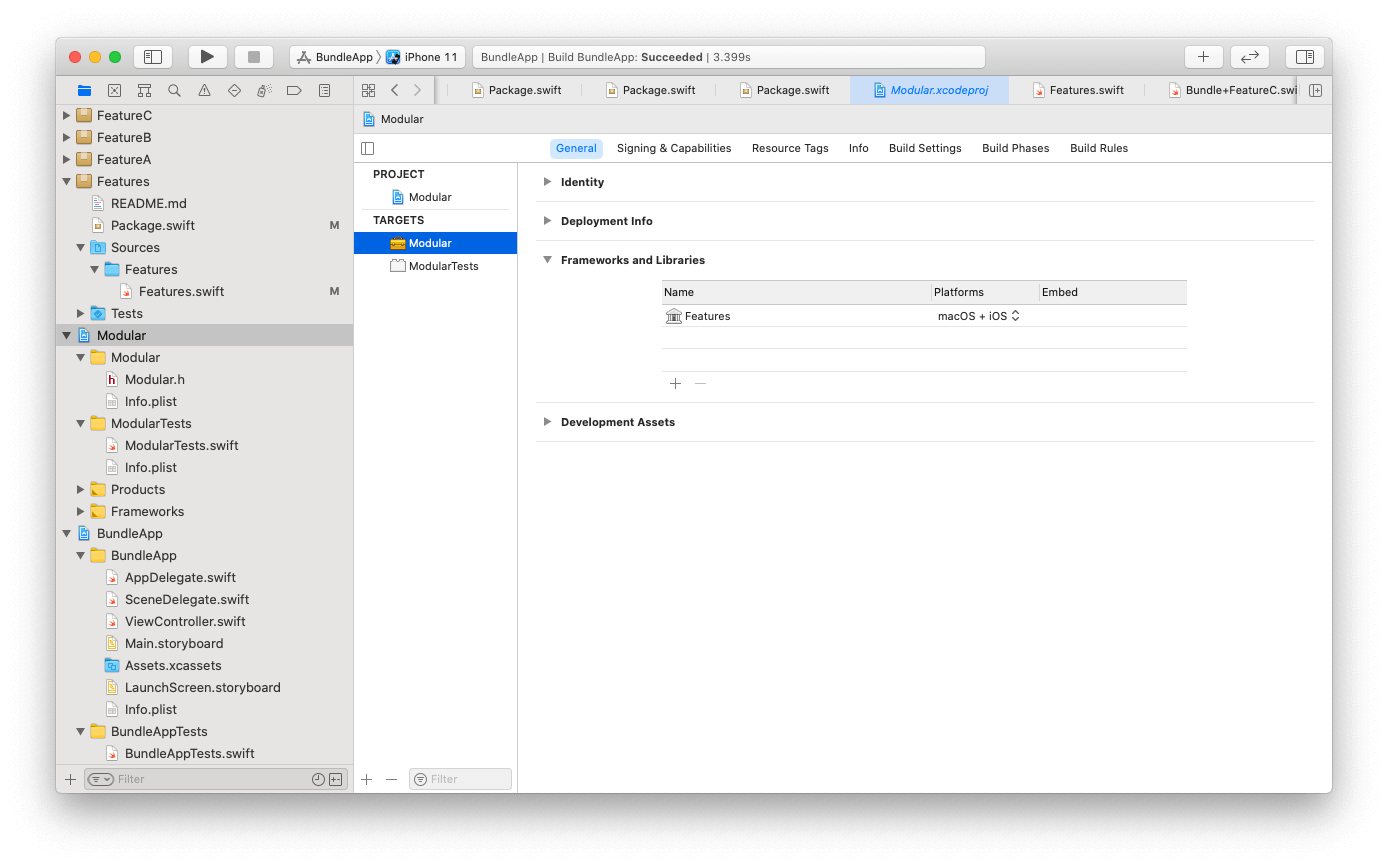
Modular 프로젝트에서 Features 패키지를 Linking 합니다.
이제 App에서 Modular 프레임워크를 임베딩 합니다.
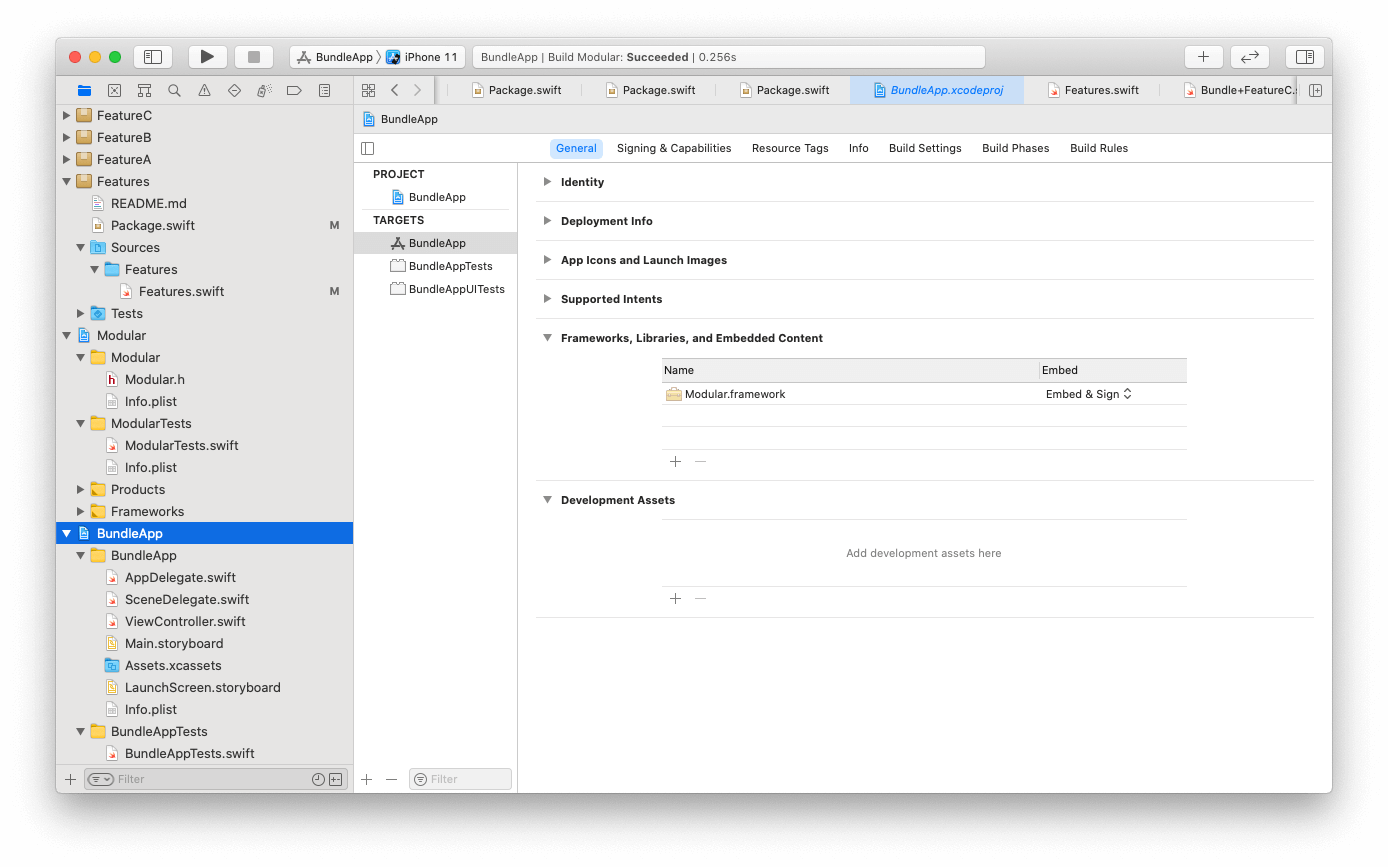
앞에서 ViewController에 버튼을 만들어 FeatureViewController를 띄웠습니다. 이번에도 FeatureA, B, C의 ViewController를 띄우도록 버튼을 만들어서 띄워봅시다.
//
//  ViewController.swift
//  BundleApp
//
//  Created by minsone on 2020/09/24.
//

import UIKit
import FeatureA
import FeatureB
import FeatureC

class ViewController: UIViewController {
  override func viewDidLoad() {
    super.viewDidLoad()

    let actionA = UIAction(title: "Feature A", handler: presentFeatureA)
    let buttonA = UIButton(type: .system, primaryAction: actionA)
    buttonA.frame = .init(x: 150, y: 200, width: 100, height: 100)
    buttonA.backgroundColor = .orange

    let actionB = UIAction(title: "Feature B", handler: presentFeatureB)
    let buttonB = UIButton(type: .system, primaryAction: actionB)
    buttonB.frame = .init(x: 150, y: 350, width: 100, height: 100)
    buttonB.backgroundColor = .red

    let actionC = UIAction(title: "Feature C", handler: presentFeatureC)
    let buttonC = UIButton(type: .system, primaryAction: actionC)
    buttonC.frame = .init(x: 150, y: 500, width: 100, height: 100)
    buttonC.backgroundColor = .green

    self.view.addSubview(buttonA)
    self.view.addSubview(buttonB)
    self.view.addSubview(buttonC)
  }

  func presentFeatureA(_ action: UIAction) {
    let storyboard = UIStoryboard(name: "FeatureAViewController", bundle: Bundle.featureA)
    let vc = storyboard.instantiateViewController(identifier: "FeatureAViewController") as! FeatureAViewController
    self.present(vc, animated: true, completion: nil)
  }

  func presentFeatureB(_ action: UIAction) {
    let storyboard = UIStoryboard(name: "FeatureBViewController", bundle: Bundle.featureB)
    let vc = storyboard.instantiateViewController(identifier: "FeatureBViewController") as! FeatureBViewController
    self.present(vc, animated: true, completion: nil)
  }

  func presentFeatureC(_ action: UIAction) {
    let storyboard = UIStoryboard(name: "FeatureCViewController", bundle: Bundle.featureC)
    let vc = storyboard.instantiateViewController(identifier: "FeatureCViewController") as! FeatureCViewController
    self.present(vc, animated: true, completion: nil)
  }
}
FeatureA, B, C의 ViewController를 정상적으로 띄우는 것을 확인할 수 있습니다.
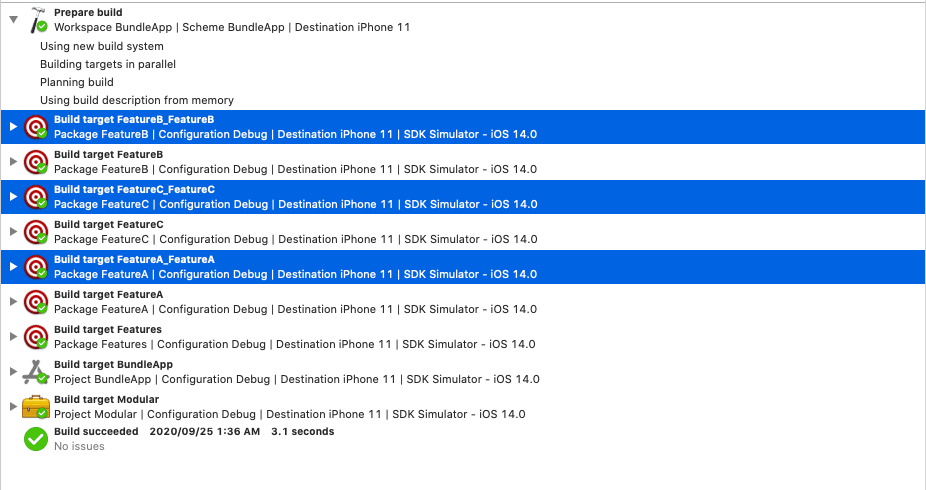
컴파일 과정을 한번 살펴봅시다.
FeatureA_FeatureA.bundle, FeatureB_FeatureB.bundle, FeatureC_FeatureC.bundle를 빌드하는 것을 확인할 수 있습니다.
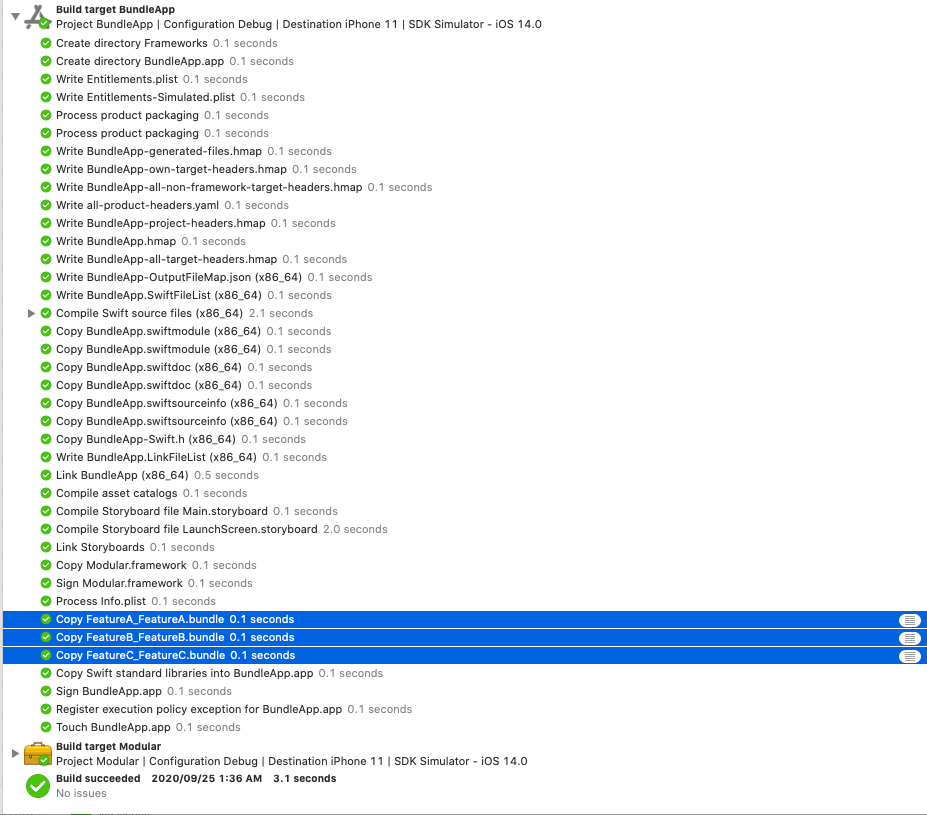
그리고 App을 빌드 할 때, FeatureA_FeatureA.bundle, FeatureB_FeatureB.bundle, FeatureC_FeatureC.bundle를 복사하는 것을 확인할 수 있습니다.
다음으로 App 결과물을 한번 살펴봅시다.
App을 살펴보면 FeatureA_FeatureA.bundle, FeatureB_FeatureB.bundle, FeatureC_FeatureC.bundle 가 있는 것을 확인할 수 있습니다.
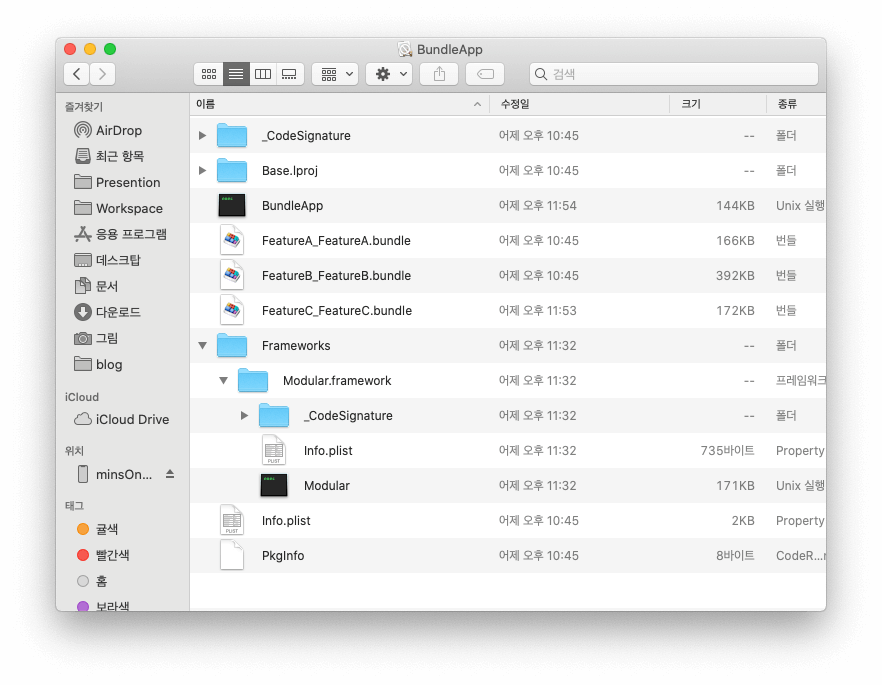
그리고 Modular에 FeatureA, B, C 코드가 복사된 것을 확인할 수 있습니다.
$ nm Frameworks/Modular.framework/Modular
                 U _$s10Foundation3URLV19_bridgeToObjectiveCSo5NSURLCyF
                 U _$s10Foundation3URLV22appendingPathComponentyACSSF
                 U _$s10Foundation3URLV36_unconditionallyBridgeFromObjectiveCyACSo5NSURLCSgFZ
                 U _$s10Foundation3URLVMa
                 U _$s10Foundation3URLVMn
...
00000000000054d0 T _$s8FeatureA0A15AViewControllerC11viewDidLoadyyF
0000000000005670 t _$s8FeatureA0A15AViewControllerC11viewDidLoadyyFTo
0000000000005a30 T _$s8FeatureA0A15AViewControllerC5coderACSgSo7NSCoderC_tcfC
0000000000005a80 T _$s8FeatureA0A15AViewControllerC5coderACSgSo7NSCoderC_tcfc
0000000000005b90 t _$s8FeatureA0A15AViewControllerC5coderACSgSo7NSCoderC_tcfcTo
0000000000005700 T _$s8FeatureA0A15AViewControllerC7nibName6bundleACSSSg_So8NSBundleCSgtcfC
00000000000057c0 T _$s8FeatureA0A15AViewControllerC7nibName6bundleACSSSg_So8NSBundleCSgtcfc
...
0000000000003ce0 t _$s8FeatureA12BundleFinder33_95646A37CBA937A02EEE194C4BEA1AA5LLCADycfC
000000000000b1d0 s _$s8FeatureA12BundleFinder33_95646A37CBA937A02EEE194C4BEA1AA5LLCADycfCTq
0000000000003d10 t _$s8FeatureA12BundleFinder33_95646A37CBA937A02EEE194C4BEA1AA5LLCADycfc
000000000000b638 s _$s8FeatureA12BundleFinder33_95646A37CBA937A02EEE194C4BEA1AA5LLCMF
000000000000b180 s _$s8FeatureA12BundleFinder33_95646A37CBA937A02EEE194C4BEA1AA5LLCMXX
0000000000004a70 t _$s8FeatureA12BundleFinder33_95646A37CBA937A02EEE194C4BEA1AA5LLCMa
00000000000106e8 d _$s8FeatureA12BundleFinder33_95646A37CBA937A02EEE194C4BEA1AA5LLCMf
...
00000000000093b0 T _$s8FeatureC0A15CViewControllerC11viewDidLoadyyF
0000000000009550 t _$s8FeatureC0A15CViewControllerC11viewDidLoadyyFTo
0000000000009910 T _$s8FeatureC0A15CViewControllerC5coderACSgSo7NSCoderC_tcfC
0000000000009960 T _$s8FeatureC0A15CViewControllerC5coderACSgSo7NSCoderC_tcfc
0000000000009a70 t _$s8FeatureC0A15CViewControllerC5coderACSgSo7NSCoderC_tcfcTo
00000000000095e0 T _$s8FeatureC0A15CViewControllerC7nibName6bundleACSSSg_So8NSBundleCSgtcfC
00000000000096a0 T _$s8FeatureC0A15CViewControllerC7nibName6bundleACSSSg_So8NSBundleCSgtcfc
...
그리고 FeatureA_FeatureA.bundle, FeatureB_FeatureB.bundle, FeatureC_FeatureC.bundle에 각 스토리보드와 이미지가 있는 것을 확인할 수 있습니다.


위 코드는 여기에서 확인할 수 있습니다.